Introduction
Wazuh is a free and opensource SIEM security platform. A SIEM is a Security Information and Event Management platform. It can be useful to help monitor all of your devices on you have locally and any other servers you may have for hosting. As well as having an Active XDR protection, which detects, analyzes, and responds to threats across devices.

Getting Started
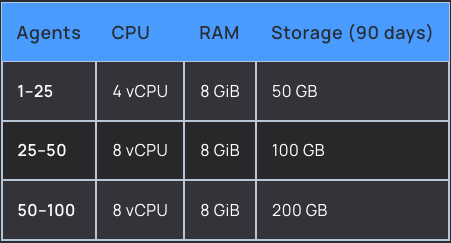
Firstly, you’ll want to decide on which way you want to install and set this up. You can run it locally in a VM, set it up with docker, or just install it on a server. They have several installation methods, so depending on how you want it set up be sure to read the docs, and be sure to meet the hardware requirements.
I’ll be setting this up on a vps using docker to install and set it up. So after getting a server that matches the requirements from whichever hosting service of choosing and configuring it to be a bit more secure, we need to install docker.
Install docker
Install docker and docker-compose from the package manager repository
sudo apt install docker.io docker-compose
Or alternatively, install docker from source
curl -sSL https://get.docker.com/ | CHANNEL=stable sh
curl -L "https://github.com/docker/compose/releases/download/$(curl -s https://api.github.com/repos/docker/compose/releases/latest | grep "tag_name" | cut -d\" -f4)/docker-compose-$(uname -s)-$(uname -m)" -o /usr/bin/docker-compose \
  && chmod +x /usr/bin/docker-compose \
  && docker-compose version
Deploying Single Node Wazuh Container
- Clone their repository
git clone https://github.com/wazuh/wazuh-docker.git -b v4.4.5
-
cd into
wazuh-docker/single-node -
Generate self signed certificates
sudo docker compose -f generate-indexer-certs.yml run --rm generator
- Start up the container
sudo docker compose up -d
- Head over to
https://{server-ip}and you should now see that wazuh is up and running
Change default admin password
Before moving on to trying it out, I would highly recommend changing the default login password as such.
- Stop the docker container
sudo docker compose down
- Generate a new hash for your password
sudo docker run --rm -ti wazuh/wazuh-indexer:4.4.5 bash /usr/share/wazuh-indexer/plugins/opensearch-security/tools/hash.sh
- After copying the new hash, edit
config/wazuh_indexer/internal_users.ymlwith the new hash for your user anddocker-compose.ymlwith the new password (not the hash).
defaults:
# internal_users.yml
admin:
  hash: "$2y$12$K/SpwjtB.wOHJ/Nc6GVRDuc1h0rM1DfvziFRNPtk27P.c4yDr9njO"
  reserved: true
  backend_roles:
  - "admin"
  description: "Demo admin user"

kibanaserver:
  hash: "$2a$12$4AcgAt3xwOWadA5s5blL6ev39OXDNhmOesEoo33eZtrq2N0YrU3H."
  reserved: true
  description: "Demo kibanaserver user"
# dcoker-compose.yml
services:
wazuh.manager:
...
environment:
- INDEXER_URL=https://wazuh.indexer:9200
- INDEXER_USERNAME=admin
- INDEXER_PASSWORD=SecretPassword # change this to the new passwd
- FILEBEAT_SSL_VERIFICATION_MODE=full
- SSL_CERTIFICATE_AUTHORITIES=/etc/ssl/root-ca.pem
- SSL_CERTIFICATE=/etc/ssl/filebeat.pem
- SSL_KEY=/etc/ssl/filebeat.key
- API_USERNAME=wazuh-wui
- API_PASSWORD=MyS3cr37P450r.*-
...
wazuh.dashboard:
...
environment:
- INDEXER_USERNAME=admin
- INDEXER_PASSWORD=SecretPassword # change this to the new passwd
- WAZUH_API_URL=https://wazuh.manager
- DASHBOARD_USERNAME=kibanaserver
- DASHBOARD_PASSWORD=kibanaserver # change this to the new passwd
- API_USERNAME=wazuh-wui
- API_PASSWORD=MyS3cr37P450r.*-Apply password changes
- Start the container up again
sudo docker compose up -d
- Run
sudo docker exec -it <WAZUH_INDEXER_CONTAINER_NAME> bashto enter the container. Container name can be gotten withsudo docker ps
sudo docker exec -it single-node-wazuh.indexer-1 bash
- Set the following vaiables
export INSTALLATION_DIR=/usr/share/wazuh-indexer
CACERT=$INSTALLATION_DIR/certs/root-ca.pem
KEY=$INSTALLATION_DIR/certs/admin-key.pem
CERT=$INSTALLATION_DIR/certs/admin.pem
export JAVA_HOME=/usr/share/wazuh-indexer/jdk- Run
securityadmin.shscript to apply changes
bash /usr/share/wazuh-indexer/plugins/opensearch-security/tools/securityadmin.sh -cd /usr/share/wazuh-indexer/opensearch-security/ -nhnv -cacert $CACERT -cert $CERT -key $KEY -p 9200 -iclYou can exit the container and the new passwords should now be set.
Wazuh Agent Setup
Now that it’s installed, we can move on to getting agents (devices you want to monitor) setup. After logging in you’ll be greeted with the dashbaord similar to the image above and to get to agents you want to click the drop down near the top left and click Agents.

You’ll then click deploy new agent on the bototm right side of the screen. Follow the steps to create a new agent, it’s very straight forward and you should be set to go.
Enable Vulnerability Monitoring
I’m not gonna do a full dive into configuring everything right now, but lastly I’ll show how to enable vulnerability monitoring in wazuh.
- From the same drop down used to access agents, click
Managementand thenConfiguration
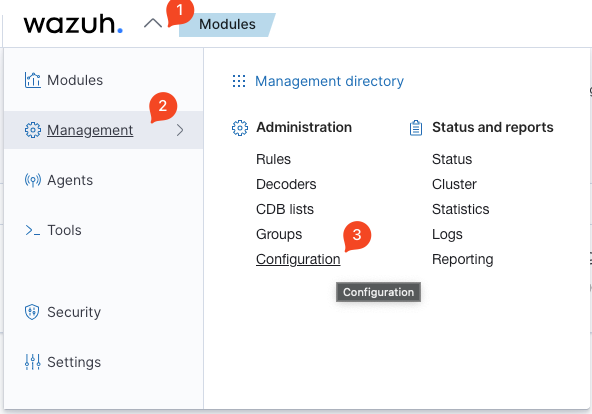
- Click
Edit Configurationand search forvulnerability-detectorand edit theenabledline to be yes. Alongside any other OS’s you want scanned for vulnerabilities. (Windows by default is set to yes)
  <vulnerability-detector>
    <enabled>yes</enabled>
    <interval>5m</interval>
    <min_full_scan_interval>6h</min_full_scan_interval>
<run_on_start>yes</run_on_start>-
Hit
savethenRestart Manager -
Then restart the service on the agents
# restart agent on Windows
restart-service -name wazuh

# restart agent on Linux
sudo systemctl restart wazuh-agent

# restart agent on Mac
sudo /Library/Ossec/bin/wazuh-control restart
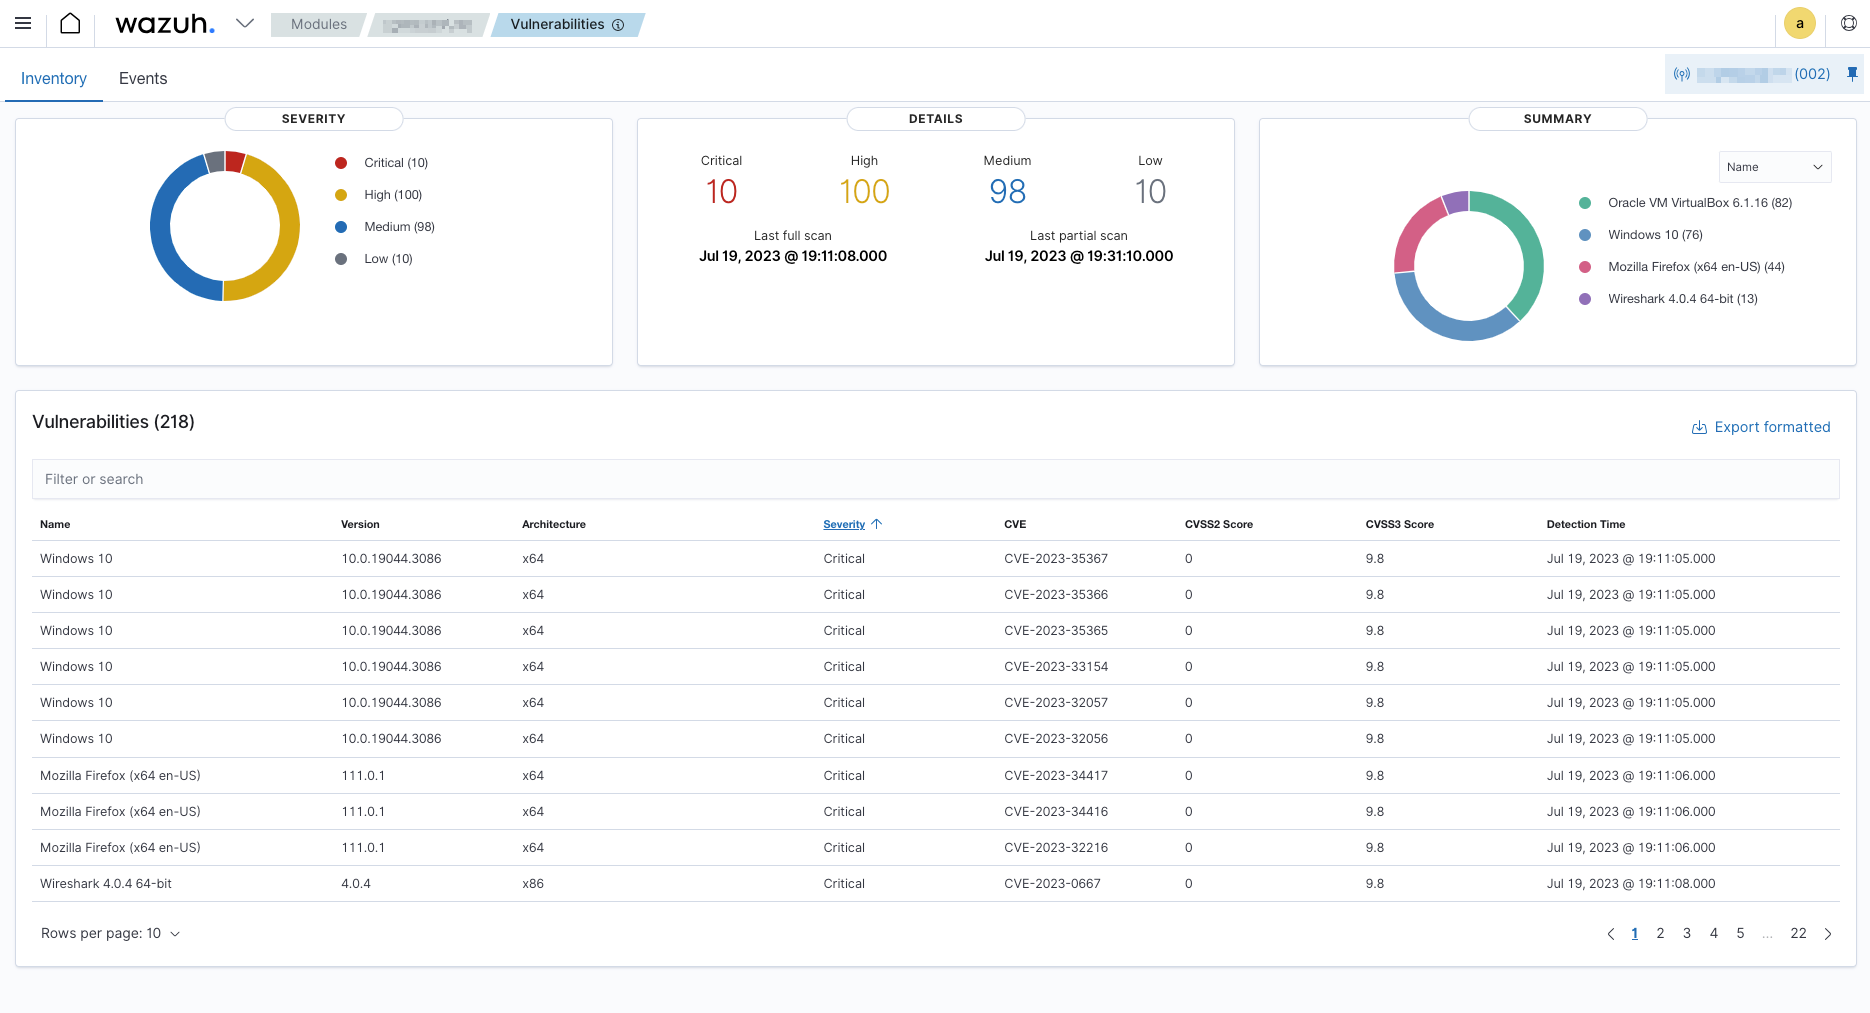
Now from the dorpdown or homepage, select Vulnerabilities and select an agent to see just how bad you need to update windows.
Closing
In closing, wazuh is an incredible tool that will help you learn more about security, help keep you, your infastructure, your business or your family secure and protected. I will be using this for the foreseeable future to manage and monitor my decives and may write more on this, depending on how much more I dive into it.